Siege warfare was heavily in use in the time of Kublai
Khan (mid-late 13th century AD)
| |
In the early days of his rise, Kublai was a prime target for kidnapping and sabotage. In retrospect, it is amazing that he eluded catastrophe to a ripe old age. In this Mongol simulation, however, Kublai has been captured and imprisoned in an enemy tower, under governship of the Sung army of Northern China--enemies of the Mongols. Similarly, the Sung have captured a rival Mongol tribe's khan, Ariq Boke, Kublai's nemesis. Ariq Boke is kept in the opposite tower (black or white), depending on which side you are playing. |
Khan Siege rescue khan picks up from historical possibilities that might have occurred in the middle 13th century. The Sung have captured your khan. Your job, playing white or black, is to rescue the khan from the tower. You must bring him back to a safe haven, one of the healing gers governed by the resident Mongol shaman. At this point, your khan becomes part of your army again, and helps you to crush your enemy, the warring Mongol tribe...
The enemy army waits for liberation of your khan, hoping to capture him and destroy him, as well as liberating their own leader from the opposite tower and defeating you on the open battlefield.
The best strategist wins...
*Khan siege rescue khan uses all the piece movements and rules of Khan.
The following initial board shows the Sung towers and the archers' range as they fire from the enemy tower:
Opening board : rescue khan
(Choosing Game..Players..Game type..Rescue Khan Start new game will select the siege 2 game for play):
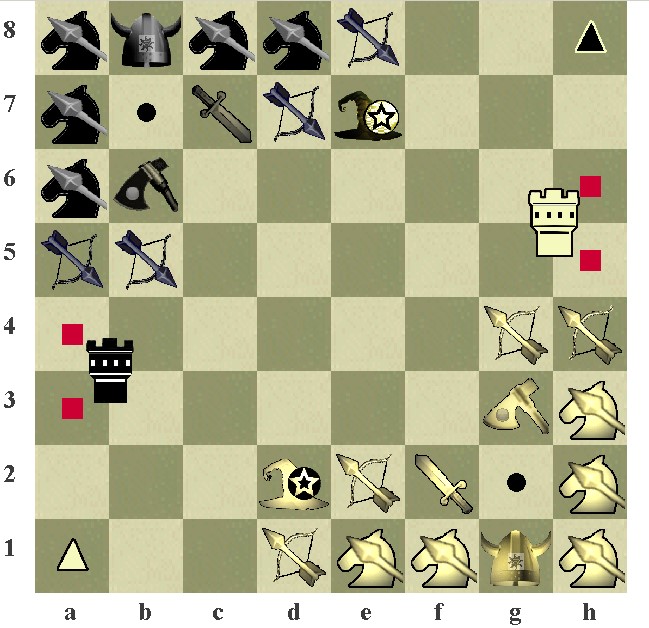
Note the absence of the khans on both sides. Each khan has been captured and imprisoned in the white and black towers respectively. Tribes are led by their respective first bondsman, at G1 and B8 respectively.
The white and black triangles at A1 and H8 denote the healing gers where each khan must be taken to recover from their ordeal in captivity.
If you are playing white, you bring your white khan to square A1. If you are playing black, you bring your black khan to square H8.
If you are playing white you might also want to thwart black's attempt to rescue his khan and transport him to H8.
Likewise, if you are playing black, you will want to thwart white's attempt to rescue his khan and transport him to A1.
So goes the struggle...
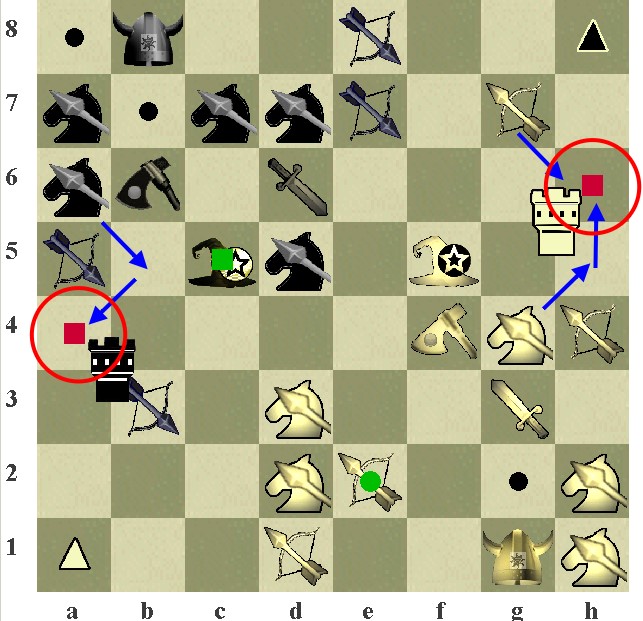
Strategy: Undermine the tower first
Develop your pieces to put a magician within spell casting range of any of the archer-manned red tower squares
White wants to let his power magician cast a spell from F5 to H5
Black wants to let his power magician cast a spell from C5 to A3:
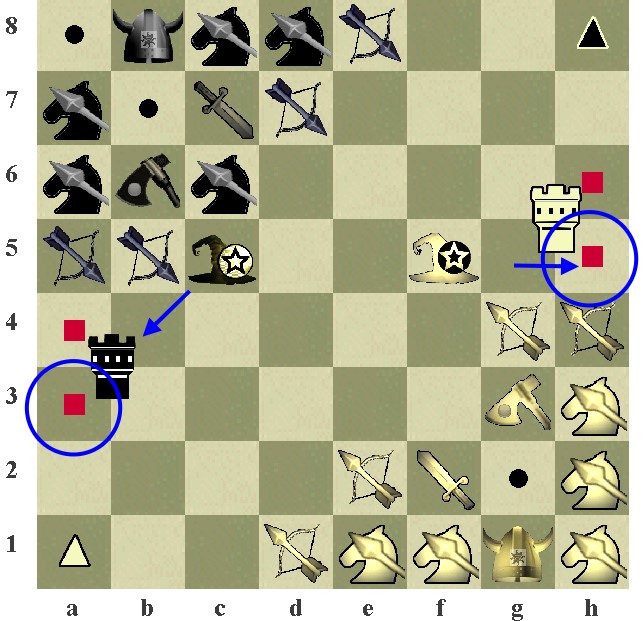
Rescue the prisoner
Once a pickup square has been established, move a piece to the vulnerable area of the tower and 'pickup' your khan. Choose a piece of the highest mobility.
For white, this would be the Warrior moving from F4 to H5
For black, this would be the Power magician moving from C3 to A3
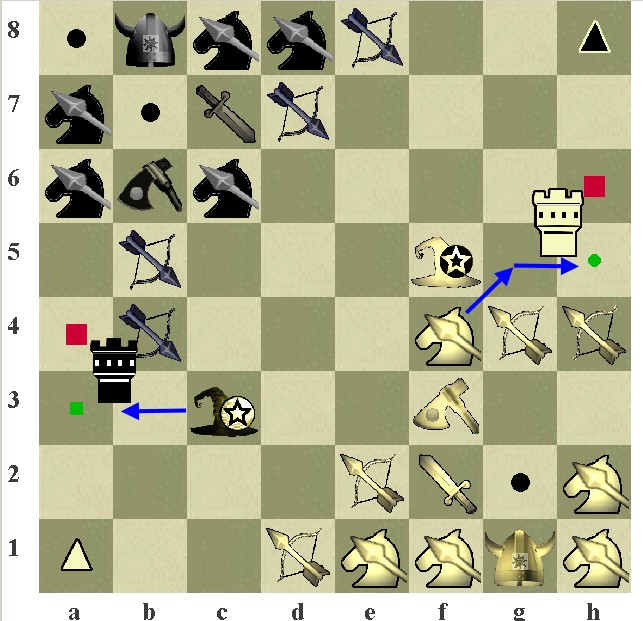
Transport the captive to safety
It suffices to manoeuvre your pieces such to get the captive to the dropoff square, in this case, A1 for white, and H8 for black.
Note that the dropoff squares are configurable under Game..Setup position
In this simplified example, you can see some obvious routes to get the captives to their respective safe havens.
Of course, in a real game, this may take many moves, and via unobvious routes, but for the purposes of an example, this depiction suffices:
 B2 -> A1 drops
off the white khan. The white warrior, holding the white captive (green
circle), brings the khan to the healing ger at A1.
B2 -> A1 drops
off the white khan. The white warrior, holding the white captive (green
circle), brings the khan to the healing ger at A1.  F7 -> H8 drops
off the black khan. The black power magician, holding the black captive
(green square), brings the khan to the healing ger at H8.
F7 -> H8 drops
off the black khan. The black power magician, holding the black captive
(green square), brings the khan to the healing ger at H8. 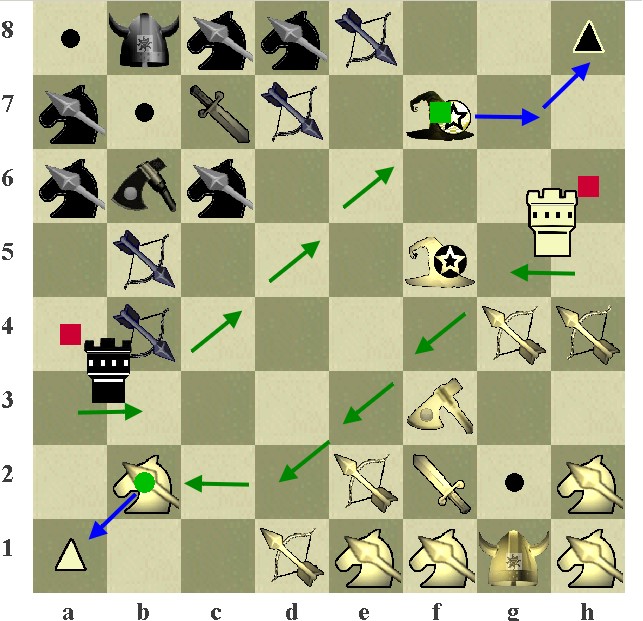
Release the captive
After having moved the captive to A1 for WHITE and/or H8 for black, the player need only move the same piece away from the dropoff square to release the healed khan. This is depicted by black and white moves below:
A1 -> C2 releases
the white khan which manifests itself at A1. H8 -> H7 releases
the black khan which manifests itself at H8. 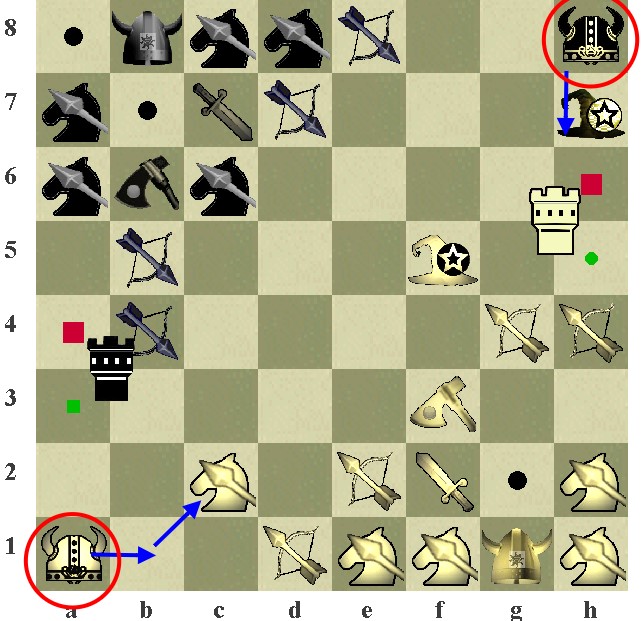
Picking up an enemy captive
It is possible to pick up the enemy captive as shown in the board below. This is a tactical move, which prevents your enemy from acquiring his own khan himself. You can 'guard' the enemy captive throughout the game, even kill the captive by deliberately walking into an armed tower square. Of course, you sacrifice your own piece.
It is important to take care, because if you unwittingly move this enemy captive to a dropoff square (A1 for WHITE, H8 for black) the enemy khan will manifest and this will likely lose you the game.
 B3 -> A3 White
archer picks up the black captive khan at A1
B3 -> A3 White
archer picks up the black captive khan at A1  F6 -> H5 Black
warrior picks up the white captive khan at H5
F6 -> H5 Black
warrior picks up the white captive khan at H5 
Capturing an enemy captive
Interesting game play can result from capturing an enemy captive in the battlefield. Specific rules apply.
Rule 1: If a piece holding its own captive captures a piece holding its own captive, the enemy captive dies
White warrior
captures the black archer and keeps its own captive while killing the
enemy captive: 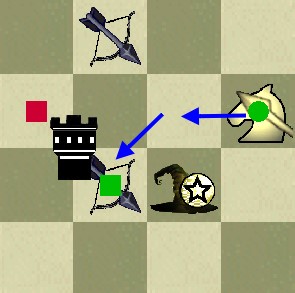 aftermath=>
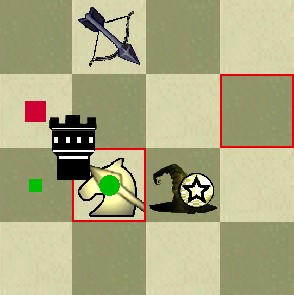
Rule 2: If a piece holding the enemy captive captures a piece holding its enemy captive, the capturing piece acquires its own captive while letting the enemy captive die that it was holding
Black warrior
captures the white archer and acquires its own captive while killing the
enemy captive 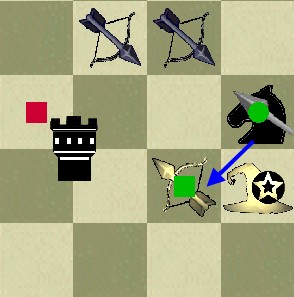 aftermath=>
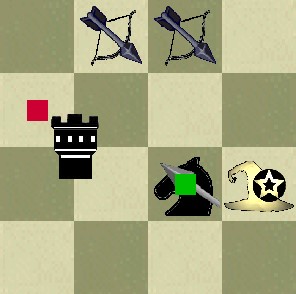
Siege transfer
A piece can pass on the captive to any adjacent friendly piece. The piece may be holding its own khan or the enemy khan:
The white
archer at E2 can pass the white khan to any of the adjacent pieces at
D1, D2, D3 The black
power magician at C5 can pass the black khan to any of the adjacent pieces
at B6, D5 Walking into the enemy tower
Any piece other than a magician that tries to breach a tower will die:
at G4 or
at G7, if they move into RED archer armed section of the tower, they die.
at A6 or  at G5, if they move into RED archer armed section of the tower, they die.
Legend:
![]() Khan dropoff square for white
Khan dropoff square for white
![]() Khan dropoff square for black
Khan dropoff square for black
![]() The red squares denote
the tower kill zone. Anything venturing here dies.
The red squares denote
the tower kill zone. Anything venturing here dies.
![]() The green circle denotes
that the piece is carrying the white khan.
The green circle denotes
that the piece is carrying the white khan.
![]() The green square denotes
that the piece is carrying the black khan.
The green square denotes
that the piece is carrying the black khan.
![]() Black circles denote
home base squares.
Black circles denote
home base squares.